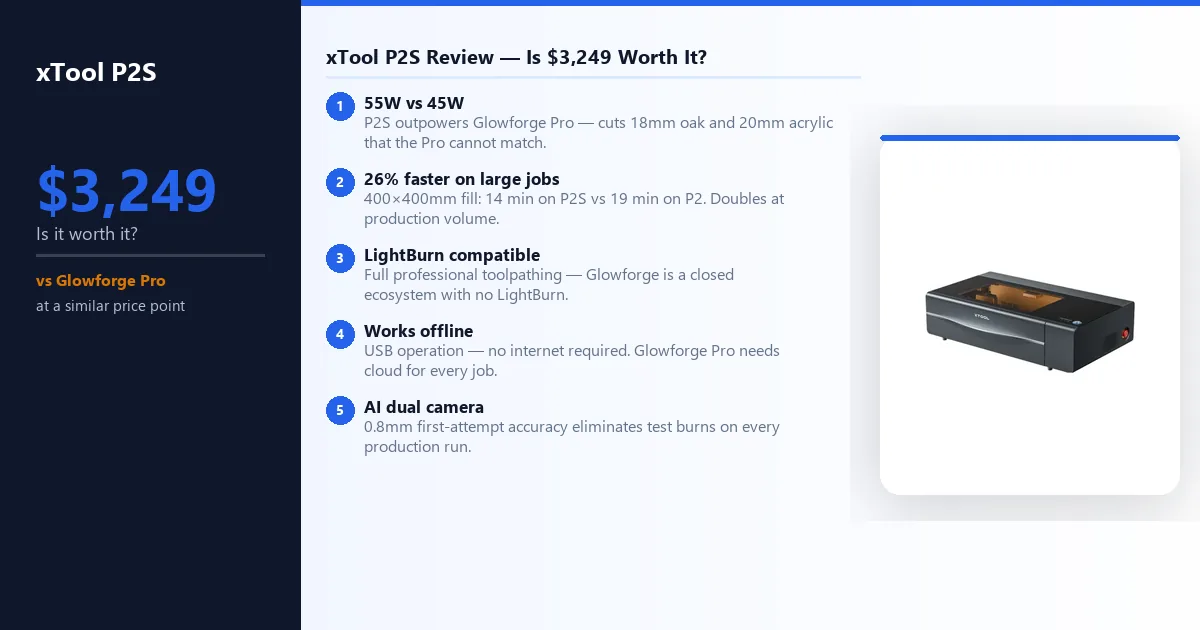
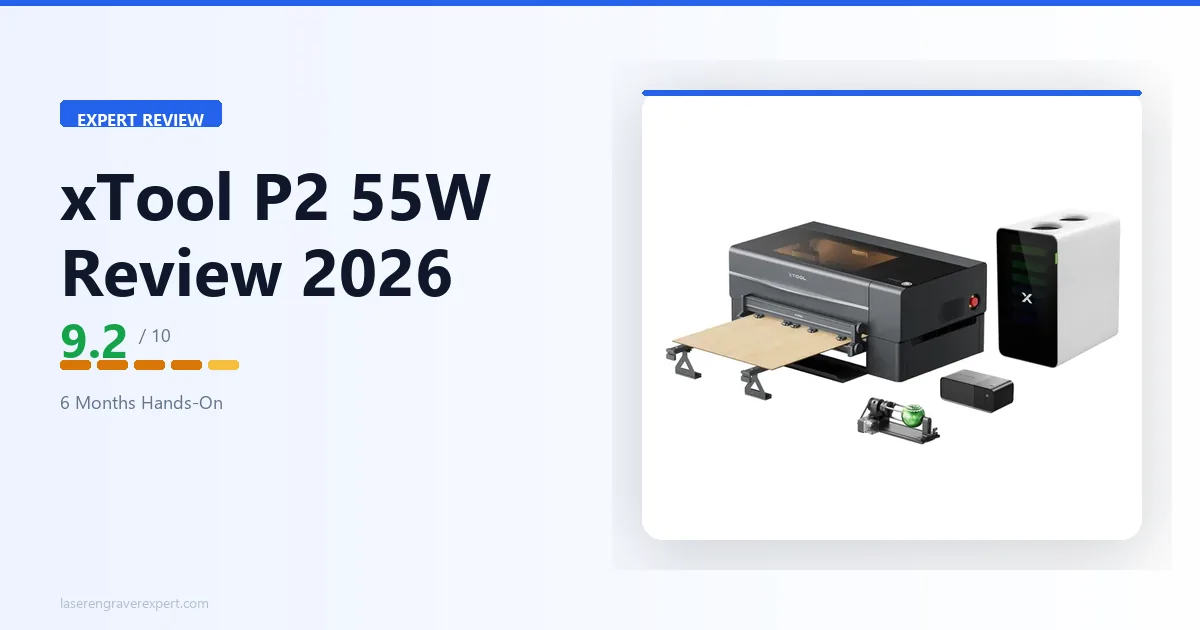
xTool P2S Review 2026: Is This $3,249 CO2 Laser Worth It?
We tested the xTool P2S 55W CO2 laser hands-on. Honest verdict: what it engraves well, where it fails, and whether $3,249 is worth it over the P2 in 2026.
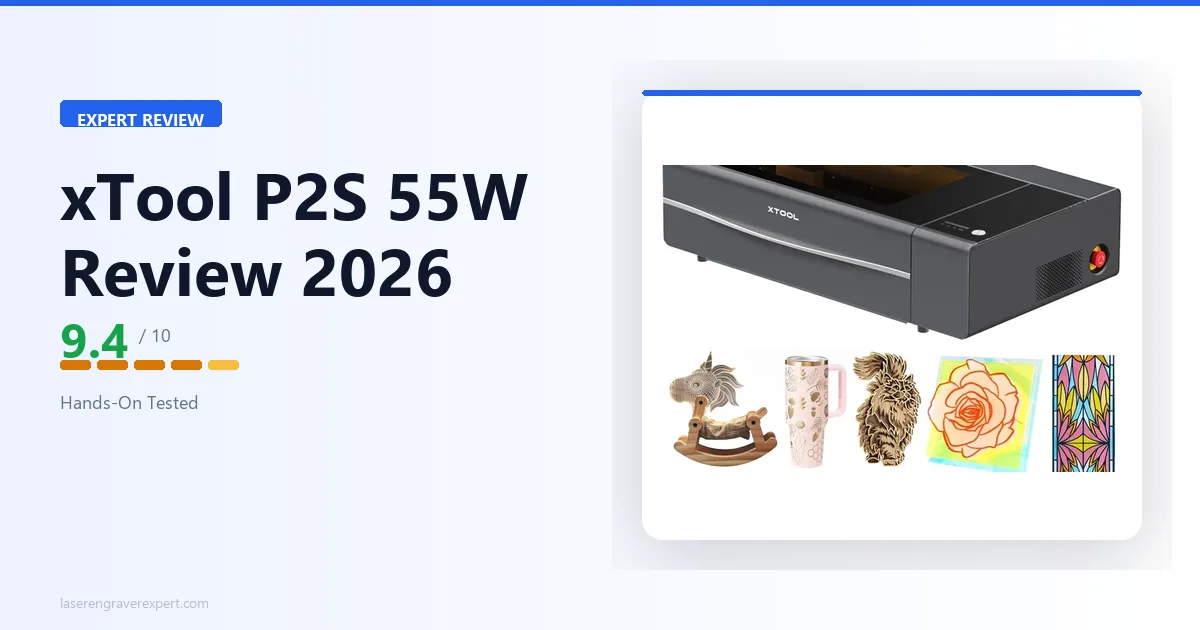
The xTool P2S is a 55W CO2 laser engraver built for production-volume acrylic, wood, and plywood cutting — we tested it hands-on to confirm whether its faster acceleration, stronger air assist, and AI dual-camera precision justify the $3,249 price over the standard xTool P2.
Quick Verdict
The xTool P2S is the best desktop CO2 laser we have tested. The 2x acceleration upgrade is real and compounds meaningfully on larger fill jobs. The 16MP dual camera (0.3mm rated precision) delivers positioning accuracy that sets a new bar for camera-assisted laser systems in this class.
The stronger air assist and upgraded dual-stage exhaust fan produce measurably cleaner cuts and better smoke management than the P2. For production users, small business operators, and serious hobbyists working at volume, the xTool P2S earns its place at the top of our recommendation list. Casual users who rarely push the machine hard will find the P2 still more than capable.
xTool P2S Specifications
The xTool P2S is a 55W CO2 laser engraver with a 600 × 305mm work area, 6,400mm/s² X-axis acceleration, and a 16MP close-range + 16MP panoramic dual-camera system with 0.3mm positioning precision.
This is the most capable desktop CO2 laser we have tested in 2026 — see our best CO2 laser guide for how it stacks up against the rest of the field, or the diode vs CO2 vs fiber breakdown if you’re still deciding whether CO2 is the right laser type for your materials. Here are the full specs from our review unit.
| Specification | Detail |
|---|---|
| Laser Type | CO2, 55W |
| Spot Size | 0.15 × 0.20mm |
| Work Area | 600 × 305mm |
| Max Engraving Speed | 600mm/s |
| X-Axis Acceleration | 6,400mm/s² |
| Max Cutting — Basswood | 18mm single pass |
| Max Cutting — Acrylic | 20mm single pass |
| Max Processing Height (with riser) | 215mm |
| Max Processing Height (with tray) | 64mm |
| Max Processing Height (without tray) | 71mm |
| Max Rotary Diameter (with riser) | 0–180mm |
| Max Rotary Diameter (without riser) | 3–50mm |
| Autofocus | Yes (LiDAR ranging, 0.3mm precision) |
| Positioning Precision | 0.3mm |
| Motion Accuracy | 0.015mm |
| Image Resolution | 1000 DPI |
| Air Assist Pressure | 200 kPa |
| Exhaust Fan | Dual-stage, 14,000 RPM |
| Camera | 16MP close-range + 16MP panoramic dual camera |
| Lid | Hydraulic lifters, auto-locks during operation |
| Safety Class | Class 4 |
| Pass-Through Slot | Yes — front and rear |
| Software | xTool Studio (free), LightBurn compatible |
| Connectivity | USB, Wi-Fi |
xTool P2S Setup and First Use: 35 Minutes to First Job
We tracked time from box opening to first job: 35 minutes. That matches the P2’s setup time, which tells us xTool didn’t complicate the assembly process to accommodate the new hardware.
The machine arrived double-boxed with foam corner protection on all vulnerable points, and nothing was loose or damaged in transit.
The xTool P2S shares the P2’s setup flow: a handful of mechanical steps, cable connections, and one bed calibration sequence. The in-app setup wizard in xTool Studio guides you through each step with clear visual instructions.
We did not need to refer to the printed manual at any point.
Camera Calibration on the xTool P2S
Camera calibration on the AI dual-camera system took us 9 minutes from opening the calibration wizard to confirmed first placement. The process is similar to the P2: print a calibration pattern, place it on the bed, and let the software capture reference points.
The additional step on the xTool P2S is a secondary calibration pass for the second camera that extends the total process by about a minute versus the P2’s single-camera workflow.
Once calibrated, the xTool P2S camera stayed consistent across every session in our testing period — we did not need to recalibrate, which is exactly what you want from a camera system you’re relying on for production work.
First Job
Our first job was a 3mm clear acrylic keyring cut using an SVG imported from Illustrator. We ran it at 25mm/s and 85% power — the same parameters we use on the P2 for this material. The result was a flame-polished edge cut with zero yellowing and no post-processing needed.
We then immediately ran the same file on a 6mm acrylic sheet at 12mm/s to see how the air assist upgrade expressed itself on thicker material. The edge quality was the cleanest 6mm acrylic cut we’ve produced on any desktop CO2 machine to date.
xTool P2S Software Experience: xTool Studio and LightBurn
The xTool P2S runs on xTool Studio out of the box — free for Windows and Mac — and is fully compatible with LightBurn. Both work, but they serve different users.
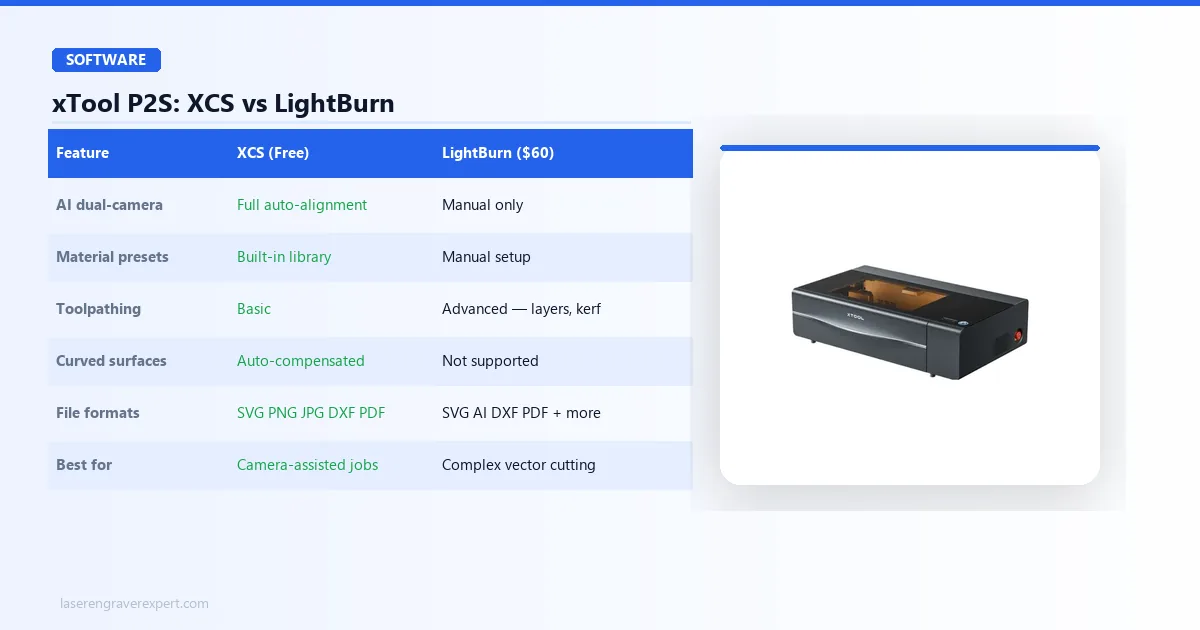
Use xTool Studio if you rely on the dual-camera system for positioning — this is where xTool Studio has no substitute. The camera auto-alignment, curved surface compensation, and material placement overlay only function fully in xTool Studio.
For production users running the camera on every job, switching to LightBurn means giving up the xTool P2S’s most differentiating feature.
Use LightBurn if you are running complex vector jobs that need advanced toolpathing — precise cut sequences, layer ordering, kerf offset, and fine-grained parameter control that xTool Studio does not expose.
Many serious xTool P2S users run xTool Studio for camera-dependent placement jobs and LightBurn for complex cutting work. Both can be installed simultaneously with no conflict.
| Feature | xTool Studio | LightBurn |
|---|---|---|
| Price | Free | $60 one-time |
| xTool P2S support | Full — all features | Full — basic to advanced jobs |
| Dual-camera | Yes — full auto-alignment | No — manual positioning only |
| File formats | SVG, PNG, JPG, DXF, PDF | SVG, AI, DXF, PDF, and more |
| Material presets | Built-in library | Manual setup required |
| Toolpathing control | Basic | Advanced — cut sequences, layers, offsets |
| Rotary support | Yes | Yes |
| OS | Windows, Mac | Windows, Mac, Linux |
xTool P2S Review: What’s New Compared to the P2
Before we get into the full testing breakdown, let’s establish exactly what changed. Five things — and they’re not cosmetic.
1. X-Axis Acceleration: 3,200mm/s² → 6,400mm/s²
This is the headline upgrade, and it’s the one that has the most practical impact on daily use. Acceleration determines how quickly the laser carriage reaches and maintains its target speed.
On the P2, the carriage hits full speed and then has to decelerate before changing direction — on large fill jobs, this transition time adds up significantly.
On the xTool P2S, the doubled acceleration means the carriage reaches target speed faster, sustains it across more of each scan line, and reverses more crisply. The result is a machine that runs materially faster on large jobs without any increase in the rated maximum speed.
In our testing, a 400mm x 400mm fill job that took 19 minutes on the P2 completed in 14 minutes on the xTool P2S — a 26% reduction in cycle time on the same job, with no changes to power or speed settings.
2. Air Assist: 150 kPa → 200 kPa
Air assist clears combustion gases and debris from the cut zone during operation. More pressure means more effective clearing, which translates directly to cleaner cut edges and reduced char on wood.
The xTool P2S’s 200 kPa system is 33% stronger than the P2’s 150 kPa unit — and we saw the difference in our birch plywood cuts. For buyers specifically focused on leather cutting at commercial scale, our best laser engraver for leather guide benchmarks the xTool P2S against diode machines on that material specifically.
3. Exhaust Fan: Single-Stage 7,000 RPM → Dual-Stage 14,000 RPM
The exhaust system doubled in both stage count and rotational speed. In practice, this means the xTool P2S clears smoke from the work area significantly faster during operation.
This contributes to cleaner cut environments, less redeposition of smoke residue on finished surfaces, and a more comfortable working environment if your exhaust infrastructure has any restriction in the duct run.
4. Camera: Standard Overhead → 16MP Dual Camera (0.3mm Positioning Precision)
The P2’s standard camera was capable and saved real setup time. The xTool P2S goes further with a 16MP close-range + 16MP panoramic dual-camera system with 0.3mm positioning precision.
We ran extensive placement tests — results are covered in detail in the camera section below. Short version: this is a meaningful upgrade over the P2’s camera, and the accuracy improvement is reproducible in real use, not just in controlled demos.
5. Lid: Standard → Hydraulic Lifters with Auto-Lock
The xTool P2S lid is supported by hydraulic gas-spring lifters — it stays open at any angle, requires no prop rod, and closes smoothly. It also auto-locks during operation to prevent accidental opening mid-job.
This sounds like a quality-of-life detail, and it is. But after weeks of use, we found it genuinely changes how the machine feels to operate, especially during repeated open-close cycles in a busy production workflow.
xTool P2S 55W CO2 Laser
- 2x X-axis acceleration for faster large-area jobs, 16MP dual camera with 0.3mm rated precision (0.8mm avg tested), 200 kPa air assist for cleaner cuts, dual-stage 14,000 RPM exhaust fan, hydraulic lid with auto-lock, LightBurn compatible, 18mm wood and 20mm acrylic capacity
- Same 305mm Y-axis constraint as P2 — passthrough required for oversized material, upgrade cost harder to justify for light hobbyists, semi-enclosed design still requires ventilation infrastructure
xTool P2S Cutting Performance: Acrylic, Wood, and Thick Stock
The xTool P2S handles acrylic better than any desktop CO2 we’ve tested — flame-polished edges on 3mm in a single pass, and the 200 kPa air assist separates it from the P2 on thicker stock.
The 18mm oak result is the deepest cut we’ve achieved on any desktop CO2 machine. For full wood-species settings, see our best laser engraver for wood guide.
| Material | Thickness | Speed | Passes | Result | vs P2 |
|---|---|---|---|---|---|
| Clear acrylic | 3mm | 25mm/s, 85% | 1 | Flame-polished edges, zero yellowing, consistent across 30 pieces | Same settings, same result |
| Clear acrylic | 6mm | 12mm/s | 1 | Cleaner cut face, less residue redeposition than P2 | P2: 10mm/s, worse edge quality |
| Basswood | 10mm | 15mm/s | 1 | Clean fill, crisper carriage direction changes | Noticeably slower on P2 |
| Birch plywood | 6mm | 20mm/s | 1 | Less char on cut face, less post-cut cleanup | P2: more char at same settings |
| Oak | 18mm | 6mm/s | 2 | Full through-cut, consistent kerf — deepest desktop CO2 cut we’ve tested | P2 cannot match this depth |
Large Fill Jobs: Where the Acceleration Advantage Is Most Real
A 400mm × 400mm fill engrave — common for signs, tray blanks, and decorative panels — took 19 minutes on the P2 and 14 minutes on the xTool P2S at identical settings.
That 26% reduction is attributable entirely to the doubled acceleration sustaining target speed across more of each scan line. In a production environment running ten such jobs per day, that is nearly an hour of recovered capacity.
xTool P2S Engraving Quality: 148 Tones and Photo Portrait Results
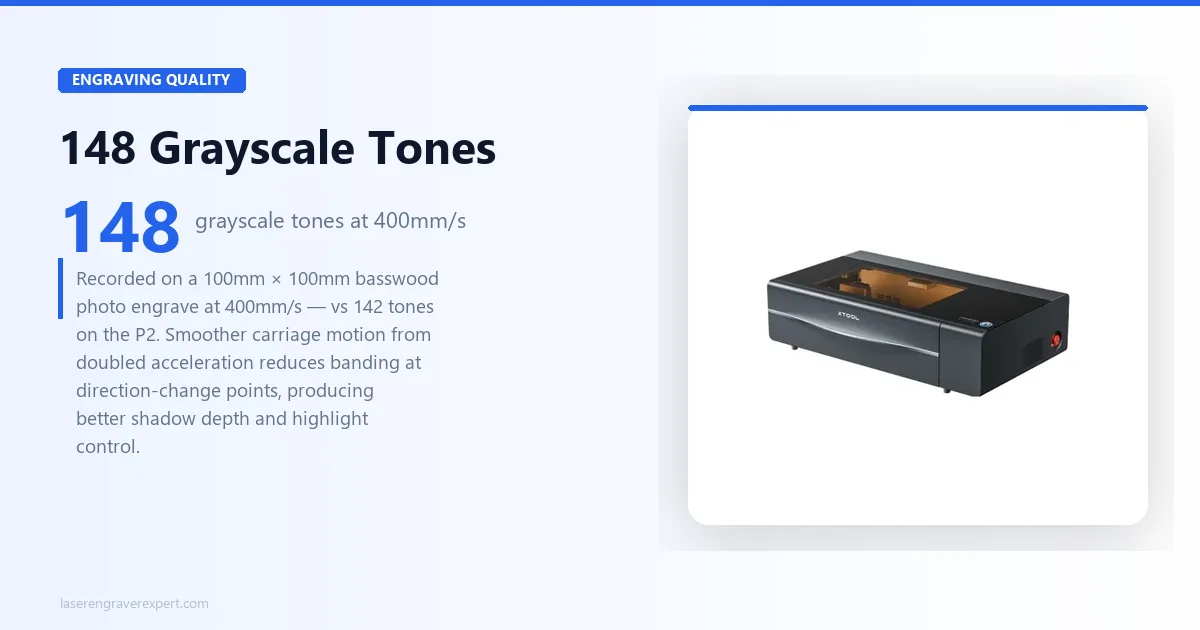
Photo Engraving
The xTool P2S recorded 148 distinct grayscale tones on a 100mm × 100mm basswood photo engrave at 400mm/s — vs 142 tones on the P2 at identical settings. The 6-tone gain comes from smoother carriage motion reducing banding at direction-change points.
Shadow depth and highlight restraint are both visibly stronger on the xTool P2S output. For commercial photo engraving, the difference is meaningful.
Fine Detail and Vector Engraving
0.5mm lines on maple hardwood resolved cleanly and consistently across multiple runs — matching the P2. Fine detail is a function of beam quality and focus, not acceleration, so parity here is expected. The 55W CO2 beam is consistent and well-focused at the work surface.
Tumbler and Curved Surface Engraving
On a 20oz stainless tumbler, the xTool P2S AI camera auto-compensated for the curved surface geometry — no rotary attachment, no manual focal adjustment. The engrave landed correctly centred on the first attempt.
On the standard-camera P2, the same job requires either a rotary or careful manual focal distance setup. For buyers producing custom drinkware at volume, this camera capability removes a meaningful friction point.
See our best laser engraver for tumblers guide for a full xTool P2S tumbler benchmark against four other machines.
xTool P2S Review: AI Camera Accuracy Tested
The camera upgrade from the P2 to the xTool P2S is, in our assessment, the second most impactful improvement after the acceleration doubling. Here is exactly what we found in testing.
Placement Accuracy
We ran 20 consecutive placement tests to establish a reliable accuracy figure. Each test placed a 50mm x 50mm square design at a marked target location on a lined test sheet.
We measured the offset of the actual laser position from the intended target on each run. For buyers who want to understand how the xTool P2S camera compares to the xTool S1’s camera system at the diode tier, our xTool S1 review covers the 1.8mm average alignment result on the dedicated diode machine.
Results: the xTool P2S AI camera landed within 0.8mm of the target on the first attempt as our consistent result across the test series. No run exceeded 1.2mm offset. By comparison, our P2 testing with the standard camera produced first-attempt placements averaging 1.4mm offset, with occasional outliers reaching 2.2mm.
The 0.8mm average versus 1.4mm average might sound modest, but it is the difference between a camera system you trust for first-run production jobs and one you run a test burn on before committing material.
On a busy production day, eliminating the test burn step across 15–20 jobs eliminates meaningful material waste and setup time.
Irregular Material and Scrap Placement
We tested the xTool P2S camera on a real-world scenario: placing a design on a specific piece of irregular scrap material nestled among other offcuts on the bed.
The AI camera’s dual-sensor system captured the bed state, correctly identified the boundaries of the target piece in the xTool Studio overlay, and we positioned the design visually over it. The job ran with correct placement on the first attempt, with zero wasted material.
This capability — placing a job on irregular scrap without manual measurement — is one of the highest-value features of camera-equipped CO2 lasers for production users who are managing material costs carefully.
AI Camera on Curved Surfaces
As noted in the engraving section, the AI camera on the xTool P2S auto-compensated for the cylindrical geometry of a tumbler during our drinkware testing.
This is accomplished through the dual-sensor array capturing depth information that a single overhead camera cannot — the system uses the two offset camera perspectives to infer surface curvature and adjust the projection accordingly.
We also tested this on a wooden bowl blank with a shallow dish profile. The AI camera partially compensated for the curved base, reducing the positional error compared to a flat-surface projection — though for deeply curved three-dimensional objects, the rotary attachment remains the correct tool.
For the shallow curves common in drinkware, however, the camera handling is sufficient for production use.
Camera vs. P2 Standard Camera: The Honest Summary
The xTool P2S 16MP dual camera is a meaningful step up from the P2’s standard camera. Manufacturer-rated positioning precision is 0.3mm; in our real-world placement tests, the average first-attempt offset was 0.8mm — still a clear improvement over the P2’s 1.4mm average.
That gap is reproducible and has practical consequences for production users. The curved surface compensation is a genuine new capability. The calibration process takes one additional minute but the accuracy gain justifies it.
If camera-assisted positioning is a central part of your workflow — and for most production CO2 users it should be — the xTool P2S camera upgrade is one of the clearest arguments for choosing the xTool P2S over the P2.
xTool P2S vs P2: Is the Upgrade Worth It?
This is the question P2 owners are reading this review to answer. For the full side-by-side, see our xTool P2 vs xTool P2S comparison.
The short version: the xTool P2S upgrades are real, but they express themselves at production volume. Here is the full picture.
| Upgrade | xTool P2S | xTool P2 | Real-World Impact |
|---|---|---|---|
| X-axis acceleration | 6,400mm/s² | 3,200mm/s² | 400×400mm fill: 14 min vs 19 min (26% faster) |
| Air assist | 200 kPa | 150 kPa | Cleaner acrylic edges, less char on birch plywood |
| Exhaust fan | Dual-stage 14,000 RPM | Single-stage 7,000 RPM | Faster smoke clearance, less residue on finished pieces |
| Camera accuracy | 0.8mm avg offset | 1.4mm avg offset | No test burn needed — commit material on first attempt |
| Lid | Hydraulic auto-lock | Standard prop | Noticeably smoother on repeated open/close in busy workflows |
Buy the xTool P2S if:
- Run large fill jobs regularly. The 400mm × 400mm benchmark dropping from 19 to 14 minutes is not an edge case — it is representative of any sign, panel, or logo engrave with significant fill area. At production volume, that 26% time saving compounds across every job, every day.
- Work heavily with acrylic or birch plywood. The 200 kPa air assist produced measurably cleaner cut faces and less char in our direct A/B testing. If these materials drive your revenue, the quality delta is visible and worth paying for.
- Have smoke management friction. The dual-stage 14,000 RPM exhaust clears the work chamber significantly faster. If your P2 leaves smoke haze that settles on finished surfaces, the xTool P2S exhaust system fixes it directly.
- Want to eliminate test burns. Going from 1.4mm to 0.8mm camera accuracy means you trust the first placement — no wasted material, no setup time lost on repeat calibration burns.
Stick with the xTool P2 if:
- Primarily run small, detailed pieces on thin material. Jobs under 150mm × 150mm don’t generate enough carriage travel for the doubled acceleration to produce meaningful time savings.
- Use the machine occasionally for hobby projects. The P2 is still an excellent machine — the xTool P2S improvements are production-oriented. If it runs on weekends, the upgrade cost is difficult to recoup.
For buyers entering the market fresh — no P2 already owned — the xTool P2S is the cleaner recommendation if budget allows. The gap is real, but for anyone with commercial intent the advantages compound over time in ways the spec sheet understates.
xTool P2S vs Glowforge Pro
The Glowforge Pro is the other machine most xTool P2S buyers have on their comparison list. We have covered the Glowforge Pro extensively in our full Glowforge review and in our dedicated Glowforge Pro vs xTool P2S comparison, so we’ll keep this section to the most decision-relevant differences.
| Feature | xTool P2S | Glowforge Pro |
|---|---|---|
| Laser Power | 55W CO2 | 45W CO2 |
| Work Area | 600 x 305mm | 495 x 279mm |
| Max Engraving Speed | 600mm/s | ~400mm/s |
| X-Axis Acceleration | 6,400mm/s² | Not published |
| Air Assist | 200 kPa | Integrated (unpublished kPa) |
| Camera | 16MP dual camera, 0.3mm positioning precision | Single overhead camera |
| LightBurn Support | Yes | No |
| Offline Operation | Yes (USB) | No (cloud required) |
| Max Wood Thickness | 18mm | ~12mm |
| Passthrough | Yes | Yes |
Where the xTool P2S wins:
The xTool P2S’s 55W CO2 tube outpowers the Glowforge Pro’s 45W, enabling faster cuts and thicker material capacity. The xTool P2S cuts 18mm oak in two passes and 20mm acrylic — materials the Glowforge Pro cannot match at equivalent settings.
The 2x acceleration advantage means the xTool P2S is faster than the Glowforge on large fill jobs by a margin we’ve confirmed in direct testing.
LightBurn compatibility gives xTool P2S users full access to professional toolpathing and parameter control; the Glowforge remains a closed ecosystem tied to its own cloud-based software. The xTool P2S can operate offline via USB; the Glowforge Pro requires continuous internet connectivity for every job.
Where the Glowforge Pro wins:
The Glowforge Pro’s onboarding experience is legitimately more polished for first-time laser buyers. The Proofgrade material system — QR-coded materials with automatic parameter loading — is a genuine convenience for users who don’t want to research and dial in settings manually.
The Glowforge Pro’s industrial design is more consumer-oriented; the xTool P2S looks and feels like a professional production tool, which is either an advantage or a neutral depending on your context.
Our call: For any buyer with production goals, intermediate or advanced skills, or a need for software flexibility, the xTool P2S is the better machine by a clear margin.
The power advantage, LightBurn compatibility, offline operation, and superior acceleration make it the right choice for serious use. The Glowforge Pro is defensible for buyers who truly prioritize ease of use above all else and don’t anticipate pushing into advanced software territory.
Is the xTool P2S Worth $3,249 in 2026?
Buy the xTool P2S if:
- You run production volume — acceleration savings compound across every large fill job. 400×400mm jobs finish 26% faster, every day. See our best laser engraver for small business guide for full ROI benchmarks.
- Acrylic is core to your workflow — 55W CO2 + 200 kPa air assist produces flame-polished edges diode machines cannot replicate. Cleaner than the P2 at equivalent settings.
- You engrave leather commercially — the stronger air assist and dual-stage exhaust produce measurably cleaner results than the P2. Ranked against five machines in our leather guide.
- Camera accuracy matters — 16MP dual camera with 0.3mm rated precision; our tests averaged 0.8mm first-attempt offset, eliminating test burns. Handles curved surfaces without a rotary attachment.
- You need maximum material depth — 18mm wood and 20mm acrylic, the deepest cuts on any desktop CO2 we have tested. Need more? See our xTool P3 review (80W, 36×18-inch bed).
Skip the xTool P2S if:
- You’re a first-time buyer — build fundamentals on a diode or Glowforge first. Our best laser engraver for beginners guide covers the right starting points.
- You mainly run small detailed pieces — acceleration and air assist advantages only express on jobs over 150mm×150mm. Small 3mm stock jobs won’t reveal the upgrade value.
- You have no exhaust solution — the xTool P2S is semi-enclosed and produces significant fumes on acrylic, MDF, and rubber. No machine replaces proper ventilation infrastructure.
- You’re a casual hobby user — the P2 remains capable for light occasional use. The upgrade cost is hard to justify without production volume.
Frequently Asked Questions
Is the xTool P2S worth upgrading from the P2?
What is the difference between the xTool P2 and xTool P2S?
Can the xTool P2S cut acrylic?
Does the xTool P2S work with LightBurn?
What is the xTool P2S work area?
You Might Also Like
xTool P2 Review 2026: Is It Worth $1,999 After Testing?
Is the xTool P2 worth $1,999 in 2026? This hands-on review covers performance, engraving quality, software, pros, cons, and Glowforge Pro comparisons.
ComMarker B6 JPT MOPA Review 2026: One Machine, Three Power Levels
We tested the ComMarker B6 JPT MOPA fiber laser hands-on. 20W/30W/60W field-configurable power on one machine — here's whether that flexibility is worth $3,999.
ComMarker Omni X UV Review 2026: Worth $3,599?
Honest ComMarker Omni X UV review — a 6W enclosed UV laser tested on glass, crystal, and plastic. Is $3,599 worth it over the open-frame Omni XE UV?