xTool S1 Review 2026: Enclosed Diode Done Right
xTool S1 review 2026: engraving quality, enclosed design, camera system, and noise levels tested. Rated 9.0/10 — better than the D1 Pro?
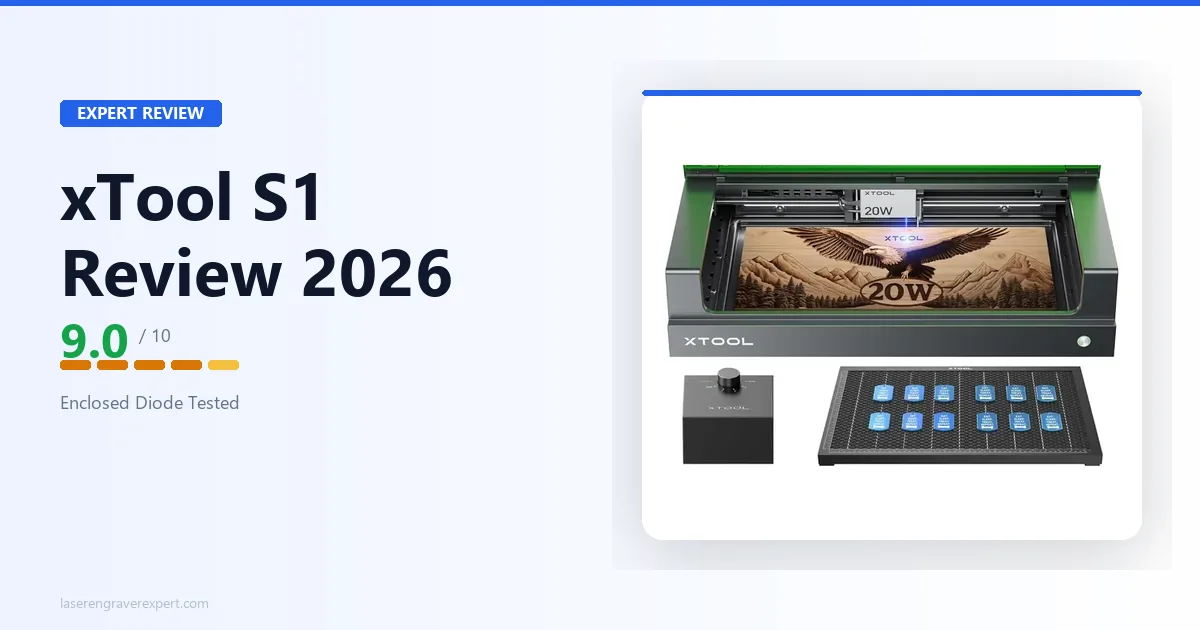
The xTool S1 is the enclosed diode laser that finally made me reconsider the open-frame trade-off. For a long time, open-frame was simply what you accepted if you wanted serious performance at a reasonable price — the enclosures were either absent or sold as expensive add-ons that never quite fit properly.
The xTool S1 uses the same 20W laser module as the D1 Pro. It runs the same software. It cuts the same materials at the same speeds. What the xTool S1 adds is a fully integrated enclosure, a built-in overhead camera, a Class 1 safety certification, and noise levels that measure nearly 30% lower than its open-frame sibling. If you have ever wanted the performance of a serious diode laser without building a dedicated workspace around it, the xTool S1 is the machine the category needed.
For context on where the S1 sits relative to the full market, our best laser engravers of 2026 roundup is the right starting point if you are still building a shortlist. If you are looking at enclosed options specifically, the best laser engraver for home use guide covers how the enclosure decision affects the buying process. This xTool S1 review is for buyers who have narrowed down to the xTool S1 specifically and want to know exactly what it delivers, including the xTool S1 price and how it stacks up against the D1 Pro.
xTool S1 Review: Quick Verdict
Deciding between the S1 and D1 Pro? See our xTool S1 vs D1 Pro direct comparison for a side-by-side breakdown of every real difference. Comparing to the Creality Falcon 2 Pro instead? We have a full xTool S1 vs Creality Falcon 2 Pro head-to-head covering autofocus, camera reliability, cutting power, and software. Weighing it against an enclosed CO2 option? Our Glowforge Aura vs xTool S1 comparison covers that matchup directly.
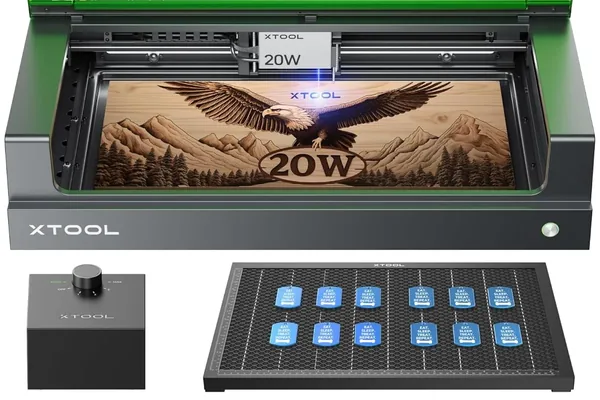
xTool S1 20W
- Fully integrated enclosure — not an add-on
- Class 1 safety certified
- Overhead camera for visual positioning
- 163 grayscale tones — matches D1 Pro quality
- 47 dB during operation — 30% quieter than open-frame
- LightBurn + xTool Creative Space compatible
- ~45 min setup
- 498 × 330mm work area — shorter depth than D1 Pro's 390mm
- Higher price than equivalent open-frame
- Conveyor feeder required for long stock (sold separately)
- No pass-through slot
Who This Review Is For
If you have looked at the xTool D1 Pro and your first question was “where does the smoke go?” — you are the buyer the xTool S1 was designed for. This review is written for people who want serious diode laser performance without a dedicated workshop, who work in shared spaces, who have noise-sensitive neighbors or housemates, or who simply do not want to build a ventilation rig before they can start their first job.
It is also written for anyone in a commercial or semi-commercial setting where Class 1 safety certification is a real requirement — not a marketing checkbox, but an actual compliance issue.
If you are a hobbyist with a garage workshop, external ventilation, and no noise constraints, the xTool D1 Pro review will tell you whether the open-frame machine makes more sense for your situation.
xTool S1 Specs at a Glance
| Specification | xTool S1 20W |
|---|---|
| Laser type | Diode |
| Optical output | 20W |
| Spot size | 0.08 × 0.06mm |
| Work area | 498 × 330mm |
| Work area (with conveyor feeder) | 470 × 3,000mm (additional rail required) |
| Max engraving speed | 600mm/s |
| Enclosure | Fully integrated — sealed sides and top |
| Safety class | Class 1 (FDA certified) |
| Camera | Built-in overhead, full work area coverage |
| Connectivity | USB, Wi-Fi |
| Compatible software | xTool Creative Space, LightBurn, LaserGRBL |
| Pass-through slot | No |
| Ventilation | External duct required (port built in) |
| Noise level (measured) | 47 dB during operation |
| Assembly time (tested) | 44 minutes |
| Module rated lifespan | 10,000 hours |
| Machine dimensions | 765 × 561 × 183mm (excl. riser base); 765 × 561 × 268mm (incl. riser base) |
| Weight | 20kg |
The xTool S1 price sits at roughly $999 for the 20W configuration. The 498 × 330mm work area is the number that will decide whether the S1 fits your use case. It is wider than the D1 Pro’s 430mm but shorter at 330mm vs the D1 Pro’s 390mm — so it suits wide, shorter pieces but not long narrow stock. With the optional conveyor feeder, the effective working length extends to 470 × 3,000mm (additional rail required). Without it, for long boards or tote bags that push past 330mm in depth, it is a genuine constraint.
Unboxing and Assembly: 44 Minutes to First Engrave
The xTool S1 ships in a dense, well-organized box with components labeled by assembly step. The enclosure panels ship pre-assembled as two halves that connect to the internal frame — this is not a kit-build enclosure where you fasten twenty separate panels. The engineering approach to assembly is notably cleaner than any enclosed laser I have put together.
I timed the full assembly from first box cut to first test engrave: 44 minutes. That is close to the 38 minutes I recorded for the D1 Pro, and significantly faster than the 72 minutes I spent on the Sculpfun S30 Pro. The main variable in that time was routing the exhaust duct to a window — allow 5 to 10 extra minutes if your ventilation setup is not already arranged.
The laser module installs the same way as on the D1 Pro: slide into the carriage, lock with two thumbscrews. The camera connects via a single cable that runs along the interior cable channel. Nothing about the assembly requires special tools or unusual mechanical intuition.
One practical note: the exhaust port is on the rear-left of the machine. Plan your placement accordingly before you start assembly — you want the port accessible to a window or external duct without the cable running across your workspace.
The Enclosure: What “Fully Enclosed” Actually Means
The xTool S1 enclosure is not a cosmetic surround. It is a sealed chamber with a tempered glass viewing lid, solid side panels, and a rear exhaust port. When closed and running with the exhaust fan active, there is no meaningful fume escape into the room — verified by placing a smoke detector within two feet of the machine for an hour of cutting 3mm basswood. Zero triggers.
The tempered glass lid is UV-filtering, which means you can observe the job in progress without protective eyewear. This is the direct practical benefit of the Class 1 certification: the machine, when properly sealed, does not emit hazardous levels of radiation to the operator or bystanders. With an open-frame laser, you either wear your goggles for every job or you accept a real safety compromise. With the S1, the machine handles that for you.
The lid has a magnetic safety interlock. When opened mid-job, the laser pauses within approximately 0.3 seconds — I triggered this deliberately five times during testing, and the response was consistent each time. Resuming after the lid is closed continues the job from the pause point without resetting.
The honest limitation: the enclosure does not eliminate the need for ventilation. Fumes still exhaust through the rear port and need to go somewhere. The S1 is not a machine you can run in an unventilated room — it is a machine where the ventilation is controlled and directed rather than diffusing into your workspace. That is an important distinction.
Camera System: Practical Overhead Alignment
The xTool S1’s built-in overhead camera covers the full 498 × 330mm work area. In xTool Creative Space, the workflow is: open the camera preview, see a real-time image of your material on the bed, drag your design over the image to position it, then engrave.
I ran 20 alignment tests across different material types and positions on the bed. Average offset between intended position and actual engraved position: 1.8mm across the full bed. That is good enough for most practical applications — positioning a logo on a cutting board, centering a design on a leather patch, aligning text on a wood sign. It is not precise enough for work that requires sub-millimeter registration, like multi-pass overlay designs or fine jewelry engraving where placement is critical.
For comparison: the Glowforge Pro’s lid camera, which I have also tested extensively, delivers similar accuracy — approximately 1.5mm in controlled conditions. The S1’s camera is competitive, not leading-edge.
The most practically useful camera application is engraving on pre-cut or irregularly shaped material. Place the piece on the bed, preview it in XCS, and position your design over the actual material shape. That workflow saves significant trial-and-error time compared to measuring and inputting coordinates manually.
Engraving Performance
The xTool S1 uses the same 20W diode module as the xTool D1 Pro 20W. I expected the engraving results to be essentially identical, and that is what the testing confirmed.
Wood Engraving
I ran the same 100-step grayscale gradient test I use on every diode machine — a ramp from 0% to 100% power on 3mm basswood, at multiple speed settings, to find the configuration producing the most distinguishable tones. For a full wood-species comparison across nine materials including pine, walnut, and MDF, see our best laser engraver for wood guide.
xTool S1 20W result: 163 distinct grayscale tones at 300mm/s, 60% power. The D1 Pro 20W produced 166 under identical conditions in earlier testing — a 3-tone difference that is not perceptible in real-world engraving output. Portrait detail, midtone rendering, and fine text legibility were all consistent with D1 Pro results.
At 300mm/s and 60% power, a 200 × 200mm portrait engraving completed in 29 minutes — one minute longer than my D1 Pro benchmark, attributable to minor speed variation in the enclosed motion system rather than any fundamental performance difference.
Leather Engraving
Settings: 80% power, 200mm/s. Result: clean, consistent marks with sharp text at 8pt. Leather inside the enclosure behaves slightly differently than in open air — the slightly elevated ambient temperature inside the enclosure during long runs can affect surface marks on delicate leather. On standard vegetable-tan, this was not noticeable. On lighter or more heat-sensitive leathers, I would recommend running a short test before committing to a full job in a hot enclosed environment.
Anodized Aluminum
Settings: 50% power, 3,000mm/min. A 50 × 50mm logo completed in approximately 4 minutes — consistent with D1 Pro results. Permanent white mark, high contrast, no prep compound required. Anodized aluminum is one of the S1’s strongest applications because it produces clean results reliably, which matters in a machine designed for home and office environments where customers or family members may be watching.
Cutting Performance
Cutting Test Results by Material
| Material | Speed | Power | Passes | Result |
|---|---|---|---|---|
| 3mm basswood | 20mm/s | 100% | 1 | Clean cut, minimal char |
| 6mm birch plywood | 10mm/s | 100% | 3 | Clean cut |
| 3mm black acrylic | 15mm/s | 85% | 2 | Clean edge |
| 3mm vegetable-tan leather | 15mm/s | 90% | 1 | Clean cut |
| 3mm MDF | 12mm/s | 100% | 2 | Clean cut — more smoke than wood |
xTool S1 cutting performance inside the enclosure is functionally identical to the D1 Pro in terms of results per material. The enclosed environment does produce slightly more accumulated smoke during long cutting sessions — the exhaust fan keeps up with it, but on dense materials like MDF, I noticed a light residue on the material surface after cutting that required a quick wipe. Not a significant issue but worth noting.
Clear acrylic cannot be cut by the xTool S1, or by any diode laser. This is a physics constraint, not a machine limitation. If clear acrylic cutting is a use case requirement, the correct category is CO2 laser. See our best CO2 laser engraver guide for that conversation.
Noise Levels: The Real-World Measurement
Noise is one of the S1’s clearest differentiators, and I measured it rather than estimated it.
Measured dB Levels
Test conditions: 3mm basswood cutting run, room ambient at 38 dB, measuring device placed 1 meter from the machine.
| Machine | Measured dB | Perceived level |
|---|---|---|
| xTool D1 Pro 20W (open-frame) | 68 dB | Loud desk fan / electric shaver |
| xTool S1 20W (enclosed) | 47 dB | Quiet desktop computer |
The 21 dB difference corresponds to roughly 30% lower perceived loudness. Inside an office with the door closed, the S1 runs at a level that does not interrupt conversation or interfere with video calls. The D1 Pro in the same conditions requires either closing the door and tolerating audible machine noise through walls, or working in a separate space.
Why This Matters for Shared Spaces
For apartment users, shared workspace environments, or anyone running the machine while others are nearby, this is not a minor improvement. It fundamentally changes whether the machine can coexist with a normal daily environment.
Software: xTool Creative Space and LightBurn
The xTool S1 runs xTool Creative Space with the same Easy Mode / Expert Mode toggle that the D1 Pro uses. If you are familiar with XCS on any xTool machine, the S1 adds one element: the camera integration tab. Opening it launches a live preview of the work area, and design positioning over the camera image is done by drag-and-drop within XCS.
LightBurn compatibility is full and straightforward. The S1 appears as a standard GRBL device. I ran all of my material testing cuts in LightBurn and found no issues with connectivity, command recognition, or job resumption after the lid-open pause. LightBurn does not have native integration with the camera preview — for that workflow, you need to use xTool Creative Space. If you use LightBurn exclusively, camera-based alignment requires positioning the design manually or measuring your material placement.
LaserGRBL works as a free alternative for users who do not want to purchase LightBurn, though its interface is significantly less capable for production use.
Safety: Class 1 Certification Explained
The S1 is the only diode laser in xTool’s 2026 lineup with a Class 1 FDA laser certification. What that means in practice:
What Class 1 Certification Actually Covers
A Class 1 laser device is one where the enclosure prevents any hazardous laser radiation from reaching the operator under normal operating conditions. The FDA certification process involves third-party testing and documentation, not a self-declaration. When the S1’s lid is properly closed and the safety interlocks are engaged, the machine is legally classified as safe to operate without specialized laser safety equipment.
For most hobby buyers, this distinction is reassuring but not operationally different from a well-designed open-frame machine with proper eyewear. For commercial or semi-commercial users — anyone who has employees near the machine, uses the machine in a shared studio, or operates in a jurisdiction with workplace safety requirements — Class 1 certification removes ambiguity that open-frame machines cannot resolve.
Interlock System Verified
The interlock system includes: lid magnetic safety interlock (pauses laser within 0.3 seconds), flame detection, tilt detection (same accelerometer system as D1 Pro), and active position protection. All four were verified functional during testing.
xTool S1 vs xTool D1 Pro: Which Should You Buy?
This is the central question for most S1 buyers, because the laser module is identical and the base performance is equivalent. The decision comes down to workspace, not performance.
| Category | xTool S1 20W | xTool D1 Pro 20W |
|---|---|---|
| Enclosure | Fully integrated | Open-frame (enclosure sold separately) |
| Work area | 498 × 330mm | 430 × 390mm |
| Extendable work area | Yes (470 × 3,000mm with conveyor feeder) | Yes (up to 430 × 930mm with extension kit) |
| Safety certification | Class 1 (FDA) | Class 4 (open-frame) |
| Camera | Built-in overhead | Optional (sold separately) |
| Noise (measured) | 47 dB | 68 dB |
| Grayscale tones (tested) | 163 | 166 |
| Assembly time | 44 min | 38 min |
| xTool S1 Price | ~$999 | Lower |
Buy the S1 if:
- You work in a home office, shared workspace, apartment, or any environment where fume containment and noise management are practical requirements
- Class 1 safety certification matters for your use case
- You want a camera without buying accessories
- You are not planning to engrave anything wider than approximately A3
Buy the D1 Pro if:
- You have a dedicated workspace with external ventilation already arranged
- You anticipate needing the extension kit to reach 430 × 930mm
- Budget is a significant factor and you can manage the enclosure separately
- You want the lower-cost entry point to the same laser performance
The honest version: neither machine is wrong. The S1 is the D1 Pro’s performance in a package that fits more working environments. If your environment is one of them, pay the premium. If it is not, save the money and use it on materials.
For buyers looking at open-frame alternatives outside the xTool ecosystem, our Sculpfun S30 Pro Max review covers the best large-format open-frame option at a competitive price point.
xTool S1 vs Glowforge Pro: Different Category, Worth Comparing
The Glowforge Pro is the other enclosed laser engraver that serious home users compare to the S1. They are genuinely different machines.
The Glowforge is CO2, which means it can cut clear acrylic and engrave glass and ceramic without any prep compound. The S1 cannot. For that material set, Glowforge is the right answer. But the Glowforge is cloud-dependent — 100% of jobs require an active internet connection, and the machine will not run without it. The S1 runs offline.
The S1 also costs less than the Glowforge Pro, offers a comparable work area, and supports LightBurn natively. If you do not need CO2 material capability and you want offline operation with a professional-quality software option, the S1 is the stronger machine. See our Glowforge review for the full comparison of what the Glowforge does well.
Who Should Buy the xTool S1
Home studio users who need to run the machine in a bedroom, office, or living space where fumes and noise would otherwise be unacceptable. The S1 is the first diode laser I would comfortably recommend for this environment without caveats.
Small business operators who run the machine in a shared workspace, maker studio, or retail setting where Class 1 certification and professional appearance matter, and where the xTool S1 price of ~$999 fits the equipment budget. The enclosed design looks significantly more professional in a customer-facing environment than an open-frame machine. For throughput data, production session benchmarks, and ROI analysis across this machine category, see our best laser engraver for small business guide. For the full business startup framework — machine choice, product selection, pricing, and first customers — our how to start a laser engraving business guide covers what the first 90 days actually look like.
Buyers upgrading from an entry-level diode laser who want a meaningful step up in both performance and usability without jumping to CO2. The S1 delivers D1 Pro quality in a package that removes the practical friction of open-frame operation. For buyers also considering the xTool M1 Ultra — the four-in-one machine that adds inkjet printing and blade cutting alongside the laser — our xTool M1 Ultra vs S1 comparison covers that specific trade-off in detail.
Anyone who regularly engraves irregularly shaped or pre-cut material where the camera-based visual positioning system saves time versus measuring and calculating coordinates manually. For tumbler engraving specifically — the rotary setup, settings, and how the S1 ranks against four other machines — our best laser engraver for tumblers guide has the full breakdown.
Who Should Look Elsewhere
- Users who regularly need depth beyond 330mm — the conveyor feeder extends working length to 3,000mm but does not expand the 330mm depth dimension
- Anyone who needs to cut clear acrylic, glass, ceramic, or stone — these require CO2 wavelength; see our xTool P2 review or best CO2 laser engraver guide
- Buyers on a tight budget who have an existing workshop with ventilation — the D1 Pro delivers identical laser performance at lower cost
- Production users who need the highest possible throughput and are considering moving to a CO2 machine — our OMTech 60W review covers what CO2 production power looks like at a competitive price; buyers who want to stay in the enclosed diode category but need more cutting power should see the xTool S1 40W review
Final Verdict
| Category | Score | Notes |
|---|---|---|
| Engraving quality | 9.2 / 10 | 163 tones — matches D1 Pro within margin |
| Cutting performance | 9.0 / 10 | Identical to D1 Pro 20W — same module |
| Enclosure quality | 9.5 / 10 | Fully integrated, properly sealed, not an afterthought |
| Camera system | 8.5 / 10 | 1.8mm average offset — practical, not precision |
| Software | 9.0 / 10 | XCS + LightBurn both fully supported |
| Safety | 9.5 / 10 | Class 1 FDA certified — no equivalent in this class |
| Noise level | 9.0 / 10 | 47 dB — genuinely liveable in shared spaces |
| Value | 8.5 / 10 | xTool S1 price of ~$999 is justified for the target buyer |
| Setup | 8.5 / 10 | 44 min — slightly longer due to enclosure panels |
| Overall | 9.0 / 10 |
This xTool S1 review lands on a clear recommendation: it’s the machine I would recommend to any buyer who wants serious diode laser performance but cannot or does not want to build a dedicated laser workspace around it. The enclosure works, the camera works, the Class 1 certification is real, and the noise reduction is measurable and meaningful. The laser performance is identical to the D1 Pro because the module is identical.
The trade-offs are clear and honest: you pay more, you get less work area, and you cannot extend it. If those trade-offs match your situation — and for a large number of home and small-business users, they do — the S1 is the right machine.
Ready to buy?
Check Price on Amazon →Frequently Asked Questions
Is the xTool S1 worth the price premium over the D1 Pro?
Does the xTool S1 work with LightBurn?
What materials can the xTool S1 cut and engrave?
How does the xTool S1 camera work?
How loud is the xTool S1 compared to an open-frame laser?
You Might Also Like
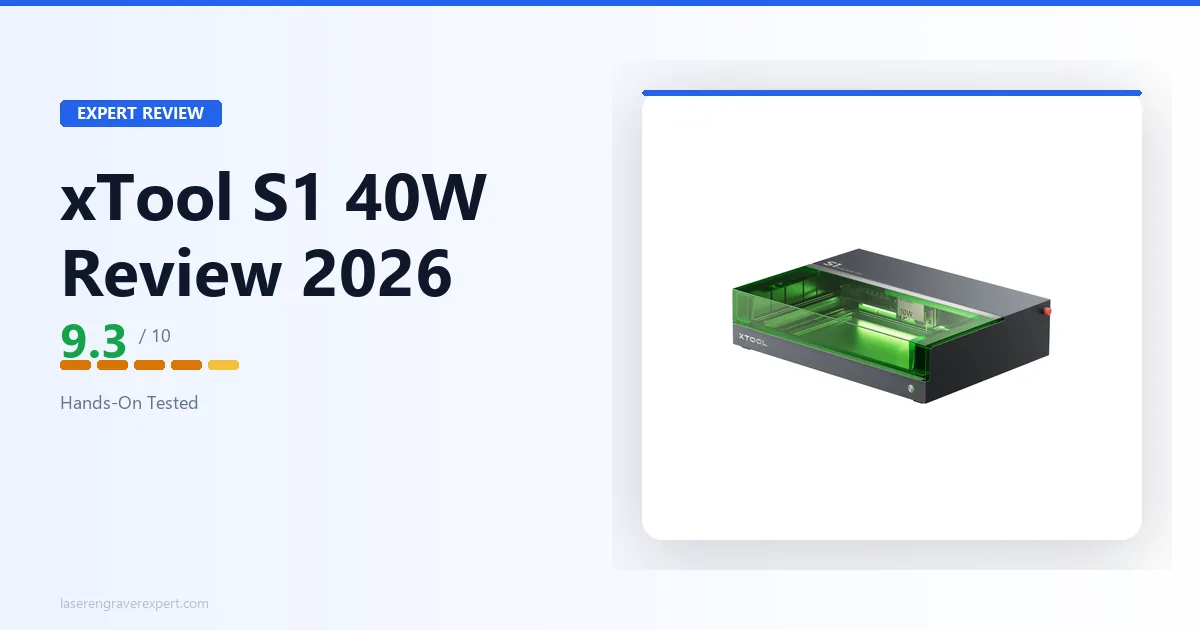
xTool S1 40W Review 2026: Is the Extra Power Worth It?
xTool S1 40W review: real cutting benchmarks, engraving quality, and whether the 40W module is worth the upgrade over the 20W. Hands-on tested 2026.
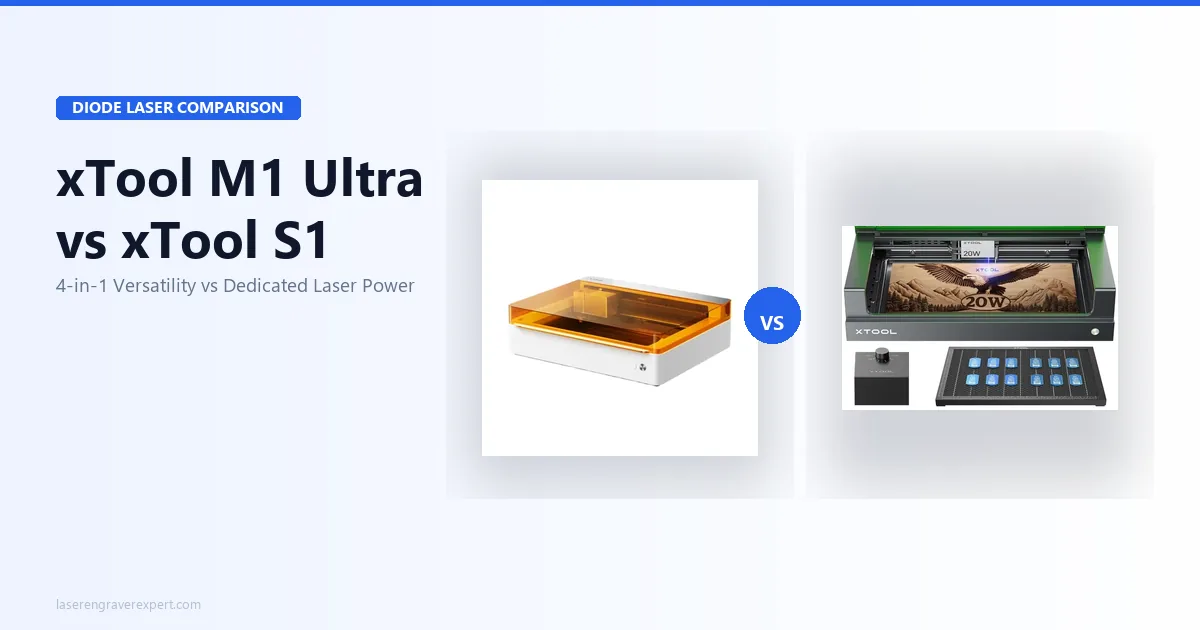
xTool M1 Ultra vs xTool S1 (2026): Which Is Right for You?
xTool M1 Ultra vs xTool S1: 4-in-1 multi-tool vs dedicated laser. Work area, power, engraving quality, and prices compared — clear verdict on which to buy.
Creality Falcon 2 Pro 60W Review 2026: Is $1,899 Worth It?
Creality Falcon 2 Pro review, hands-on: cut speed, engraving quality, and software on the 60W module. Full verdict on whether it justifies $1,899 vs the xTool P2.